February 11, 1999
Game Six
White: Ty Davison
Black: Allen Starfy
Opening: C68 Ruy Lopez, Exchange Variation, Alapin G
E-mail, Game 6, 1998
1. e4 e5
2. Nf3 Nc6
3. Bb5 a6
4. Bxc6 dxc6
5. O-O
Ty: Up to this point we've simply played the main line of Ruy Lopez exchange variation, an opening which Bobby Fischer used to great success. (Of course every opening Bobby Fischer used, he used to great success). It recent years I understand it's been de-fanged and is no longer considered very dangerous. I like it because it strikes me as very intuitive--the kind of opening I could play without having to calculate a multitude of combinations and which leaves White developed well early.
Al: As you know I really don't care much for open games; I guess I subscribe to the Karpov school of chess. But I did find this game very exciting.
5. ... Bg4
6. h3 h5
7. d3
Ty: Through here we're on the variations of the main line.
7. ... Bd6
Ty: It's right here that Al casts aside the book move of 7. ... Qf6. The first question to ask is, "What does Qf6 do that Bd6 doesn't?" That's what I want to exploit.
Al: In answer to your question; moving the Bishop first was merely a personal choice. I just wasn't ready to commit the Queen yet and was considering castling.
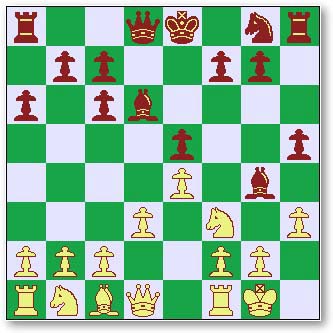
8. hxg4?!
Ty: Either I've got the courage of Hercules or the brains of a peanut (or both). Black's 7. ... Bd6 left book, so I thought this would be interesting to try. It's not terribly sound (in fact it's horribly unsound) as it leaves the kingside wide open and I've already castled here, but this will (1) give me a minor piece advantage and (2) create a very open game. It will be interesting to see if these advantages will be enough to off-set the gaping hole I've left in my pawn wall.
8. ... hxg4
9. Ng5 Qd7
Ty: White must to be careful here. He's a minor piece up, so he can sac the Knight if need be, but he needs to obtain a good positional advantage in return. The options: 10. Nxf7 (Qxf7 11. Qxg4) plays out to a pawn advantage for White by sacrificing the Knight, but it leaves Black very dangerous kingside. This is the most conservative option I considered. The second option of 10. f3 is dangerous because of the many playable options it leaves Black (it forces next to nothing), and it also eventually sacs the Knight if Black chooses to go after it. White should end up with at least a pawn advantage, but this too comes with some positional difficulties, particularly if Black decides to close the kingside via 10. ... g3. The final option (and the one I chose) is 10. c3, which I thought the most daring move available; it opens a diagonal for the Queen while leaving the Knight in a very precarious position.
10. c3 f6
Al: I really wasn't sure what to do at this time; I played it out again and again and finally opted to take the Knight (which was cramping the position) even though I knew it would cost me 2 pawns.
11. Qb3 fxg5
Ty: White kisses his horse goodbye in return for a strong Queenside attack; this is particularly dangerous because White's kingside is poorly defended.
12. Qxb7 Rc8
Ty: Al correctly sacs the pawn and solidifies his central defense.
13. Qxa6 Ne7
Al: It was at this time I figured out how I was going to attack using the h-file. But first, I need to tuck my King in where it should be safe for a bit.
14. Bxg5 Kd8
15. g3
Ty: This looks a little odd, but the objective is to lock in Black's g4 pawn and take away the c8-h3 diagonal from the Queen.
15. ... Qe8
16. Kg2
Ty: God save the King! White tries to open the back rank for his Rook and take away mating threats via Black's Queen and Rook.
16. ... Kd7
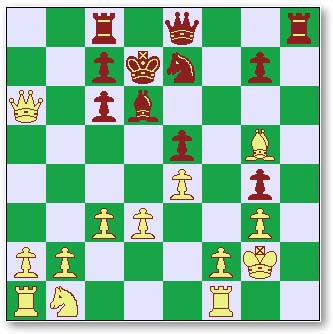
Ty: I prefer the line of 16. ... Qh5 17. Bh4 Kd7 18. Rh1 Ng6 which launches a very strong kingside attack with good chances of breaching my defense. White is simply unable to mobilize his pieces sufficiently to respond to this threat. Although my pawn structure is fine, my minor pieces are poorly developed for this stage of the game.
17. Nd2 Rh5
18. Bxe7
Ty: White's Bishop is a dead man either way, so he might as well take somebody with him.
18. ... Bxe7
19. b4 Rb8
20. a4 Qh8
21. Rh1 Bg5
22. Nc4 g6
23. a5 Bf4
24. gxf4
Ty: Black sacrifices his Bishop in return for some major league shots at the King. I had to calculate pretty far ahead to make sure that taking the Bishop wasn't doomsday.
Al: I planned this attack out beautifully; imagine my surprise after about 6 more moves when I realized that I'd forgotten to play g5 covering the f4 square! I'd put everything into this and left an escape.
24. ... exf4
25. Qa7 f3+
26. Kg3 Rh3+
Ty: As Al mentioned a couple moves back, ... g5 is an intriguing play. In fact, if White's not very, very careful 26. ... g5 is a potential game-winner because 27. Ne5+ Kd6 28. Nxg4 Rxh1 29. Rxh1 Qxh1 and it's time for White to resign. (27. Rxh5? is also bad news for White.) Unfortunately, 27. Kxg4 seems to be a solution to the 26. ... g5 problem. I confess that I missed the possibility of 26. ... g5 utterly during the game, so it's a good thing I can't find a way for Black to get a checkmate out of it.
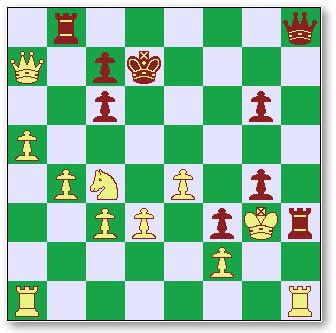
27. Rxh3 Qxh3+
28. Kf4 Rf8+
29. Ke3 Qh6+
30. Kd4 Ke6
Ty: I found this move very surprising at the time because it let my heretofore isolated Queen back into the game; nevertheless, I can't find any other line that plays out better. Even my favorite at the time, 30. ... Qg7+ can do no better than achieve material equality with poor position.
31. Qxc7 Qh8+
Ty: This was a huge relief, because I desperately wanted to trade out Queens. Mine had been isolated and relatively out of play since early on and remained blocked by my wonderful pawn structure. (Oh joy.) In contrast, Al's Queen was highly active and capable of causing me lots of problems.
32. Qe5+ Qxe5+
Al: I'd felt that I'd had control of this game (sans blunder) since move 10. In trading Queens I saw the most I'd probably be able to do...was draw.
33. Nxe5 Rd8+
34. Kc5 Kxe5
Ty: Despite losing my Knight in the Queen exchange, I liked my chances in the end game thanks to pawn structure. My analysis here showed the worst I could do was draw unless I blundered.
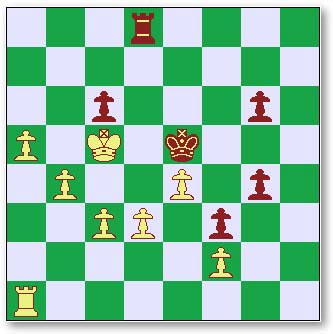
35. Kxc6
UPDATE: In hindsight, 35. Kxc6 is clearly a mistake. There is no compelling reason to take the c6 pawn; it's the tempo here that's crucial. By taking c6, White does not quite give Black an opportunity to draw, but he makes the game much closer than it would otherwise be and for no apparent advantage, since the priority is queening the b-pawn. Better is 35. a6
35. ... Rxd3
36. a6 g3
37. a7 Rd8
38. a8=Q Rxa8
39. Rxa8 gxf2
40. Ra1 Kf4
Ty: I think this should have been 40. ... Kxe4 because 41. b5 Ke3 42. b6 Ke2 43. b7 f1=Q 44. Rxf1 Kxf1 45. b8=Q f2 46. Qh2 Ke1 47. Qg2 f1=Q 48. Qxf1+ Kxf1 49. c4 g5 50. c5 g4 51. Kd5 g3 52. c6 g2 53. c7 g1=Q 54. c8=Q. This is a long set of calcs and perhaps I've gotten it wrong, but it looks like a draw is possible.
UPDATE: This long set of calculations is, in fact, wrong because it requires the blunder of 46. Qh2? by White in order to get the draw for Black. If White plays Qb1+ instead and uses that to work his Queen above the King, he can Queen his c-pawn by advancing it whenever he gets Black's King in a pawn-blockading position of f1. White simply needs to keep Black's King jumping between f1 and check, and White is ultimately guaranteed victory.
41. b5 1-0
Ty: One heck of an exciting game, featuring some pretty poor positional play by yours truly, and some good defense and counterplay by Al. This was a very narrow victory for White.
Al: Very nice albeit stressful game. It was one I felt had "fallen" into my lap and which I, nonetheless, was able to blunder away. But White must be congratulated for not only playing a great game, but in turning what was almost a loss into a positive win.
|