February 11, 1999
Game Three
White: Allen Starfy
Black: Ty Davison
Opening: A23 English, Bremen System, Keres Variation
E-mail, Game 3, 1997
1. c4
Al: I chose the English opening basically to try to throw you off a bit, which it did for a time but obviously not long enough. As with the Caro-Kann in the last game, this is something I've been studying for awhile but hadn't attempted to use in a game until now. Why I keep trying new things against a person I have yet to beat is beyond me.
Ty: Well, your efforts to confound me out of the gate succeeded. I have no idea what to do with a c4 opening. ExaChess Lite identifies our first few moves as an "A23 English, Bremen System, Keres V" opening, but frankly, I'm already in foreign territory (no pun intended) after move 1. Nonetheless, what can we glean from a c4 opening? Foremost, that White's probably going to castle Kingside.
1. ... e5
Ty: My natural "attack the center" strategy.
2. Nc3 Nf6
3. g3
Ty: This is instructive because it means White will probably fianchetto his Bishop kingside. I find this interesting because I think normally one fianchettos the Bishop on the side opposite the castle, though perhaps this is part of the English opening. Al?
Al: The choice of which side to fianchetto the Bishop is more, I believe, a matter of personal taste, although most of the games I have studied using the English do it as I did. Also, most of the lines in MCO-13 show this to be the best way.
3. ... c6
4. Nf3 e4
Ty: One hallmark of the aggressive style I prefer is that I frequently attempt to dictate my opponent's movement.
5. Nd4
Ty: Unfortunately, in this case that's resulted in Al placing his Knight in the middle of the board. We can't have that.
5. ... Bc5
6. e3 Bxd4
Ty: It costs me a Bishop to get rid of Al's Knight, but I really don't want to cede control of the center.
7. exd4 d5
8. cxd5 cxd5

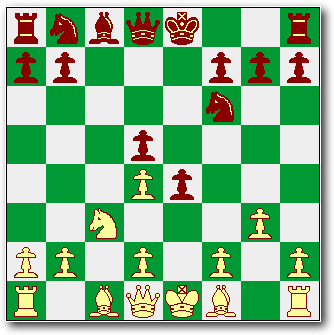
Ty: It's worth taking a look at the pawn structure at this point. White's got three pawn islands and is doubled in the middle. Black technically has two pawn islands, but more importantly there's a protected two-pawn chain in the middle. Still, White can break it by playing d3.
Al: By this time, looking at the structure of the pawns, I was beginning to get a bad feeling. You had won the last two games based almost entirely on your superior pawn structure. I knew I had to do something to break up your pawns early in the game or face the same constricted middle-game I played in the last two games.
9. Bg2 O-O
10. O-O Nc6
11. Qa4
Al: Not sure of the soundness of the move; I wanted to block the Knight and protect my center pawn. Once I had moved the Bishop out (move 13) the Queen didn't seem to serve much of a purpose on a4. Although, in hindsight, I should have played a3 first to prevent the Knight from making a home on b4.
Ty: I now like this move better than I did originally. I don't see any options for Queen play from this position, but as a temporary block of the c6-Knight and as a protector of the central pawn, it does just fine.
11. ... a6
12. d3
Ty: Just as my opinion of 11. Qa4 went up, my opinion of 12. d3 went down, but only because it's one move early. 12. a3 should have come first. On its own merits, 12. d3 is a good and necessary move even though it sacrifices a pawn. White's got to bust up Black's pawn chain, and the doubled pawn's not doing anything anyway. (Though notice that if White's Queen is still around this becomes a trade, not a sacrifice, and if Black's chosen to play Nxd4 then the Knight will be forced to vacate the center.)
12. ... exd3
13. Be3 Bf5
Ty: Both sides move to protect lead pawns, but there's difference: Black's now got a protected passed pawn on d3. White's pawn remains blocked by d5.
14. Qd1
Ty: Not wrong but premature, I think. White probably should've played a3 first to lock up the b4 square and keep Black's Knight on c6.
14. ... Nb4
15. a3 Nc2

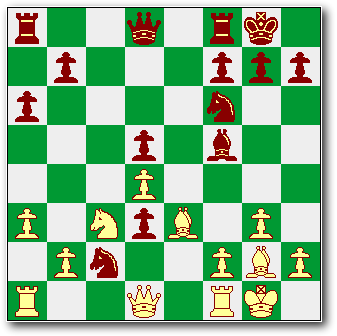
Ty: With 15. ... Nc2, Black establishes a deep outpost in White territory. Notice that the key to the outpost is actually located with the Bishop on f5.
Al: Once the Knight hit b4 there was no way to stop this move. My pieces are very congested due to your d pawn. All I can make at the moment are defensive moves until I get some space.
16. Ra2
Al: Possibly an error, my thinking behind it at the time was to move the b pawn and have a shot at the Knight. I was also trying to prevent a possible Queen advance.
Ty: I agree this is questionable. On a2 the Rook will be out of play for a long time. Even though there's no immediately apparent advantages, I like Rb1 or Rc1 a lot more.
16. ... Re8
17. Bg5 h6
Ty: I prefer this to 17. ... Qd6 because it forces White to do something with the Bishop or lose it. True, it's a crack in the King's pawn wall, but that's an acceptable trade-off to me.
18. Bxf6 Qxf6
19. Nxd5 Qxd4
20. Nf4
Al: This took a lot of thought for me, especially when I could have won a Rook had I played differently. But, I just felt that the Knight was much more valuable here.
Ty: I like this move a lot, but I was utterly flabbergasted by it at the time. I fully expected a 20. Nc7 which forks the Rooks, and when it didn't come, I had to re-work my plans considerably. All of which is my really lame excuse for my next move, the very horrible:
20. ... Qc4?
Ty: Yuck. A bummer of a mistake. Dumb with a capital D. Not a bad attacking strategy mind you, but a couple of moves premature and now a game I felt pretty confident about is a mess. Much better would been 20. R(a)b8 which breaks the Bishop's pin.
Al: I could see no point at all for this move, and I knew you'd be kicking yourself when you saw my next move.
21. Bd5!
Ty: Al quite rightly makes me pay.
Al: I'm finally getting some space and heading for Black's b-pawn. In having to move the Queen again Black has lost a tempo.
21. ... Qd4

Ty: White's Bishop threatens and my Queen returns to safety. I've just wasted a turn, yielded control of the center, and lost the initiative. Oops.
22. b4 g5
23. Bxb7 Rad8
24. Bxa6?!
Al: Possibly a mistake, but in looking at the probable endgame, I didn't want to have to worry about a passed pawn.
Ty: Ouch. Al and I may disagree here, but I think 24. Ng2 is preferable. White's gained the a6 pawn, but lost a Knight and at minimum White's pawn blockade in front of the King could be opened wide at any time. (Another intriguing possibility instead of 24. Bxa6 is 24. Nd5.)
24. ... gxf4
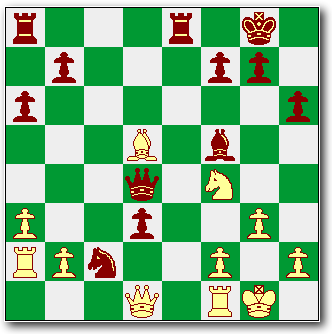
Ty: The big difference between the Knight outposts on c2 and f4 is that on c3 there's no pawn which can drive off the Knight. The Black Knight can be taken, but only at the cost of a piece of equal or greater value. On f4, however, the pawn on the g-file can still force the Knight away or take it outright.
25. Bb5
25. ... Re1!

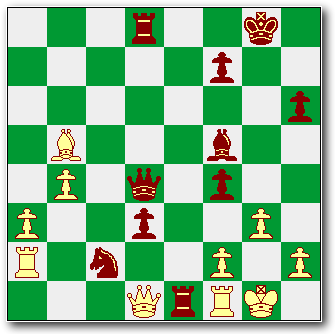
Ty: This is the beginning of a long-planned and very interesting sequence. White will be forced to trade out Rooks and will have the option of taking the Knight and leveling the field in terms of material, but taking the Knight will spell big trouble positionally.
Al: I was really hoping not to see this move at this time.
26. Rxe1 Nxe1
Ty: I'm not sure if this technically qualifies as a sacrifice because while Black's Knight definitely gets munched without immediate compensation, I can't find any way for White to enter into the end game without being down by at least one major piece.
27. Qxe1
Ty: Qxe1 isn't a mistake, but White's in serious positional trouble. Nonetheless, I can't find a better move. (Even 27. Rd2--which lets the Black Knight go but blockades the d-pawn--fails after a couple of moves.) This is an excellent example of the importance which position plays; in terms of material, White is actually up a pawn.
Al: I played the next few moves out five different ways, but, it kept coming down to poor position. My only chance is to make a brilliant move (which I don't have) or a really stupid move (options aplenty).
27. ... d2
28. Rxd2 Qxd2
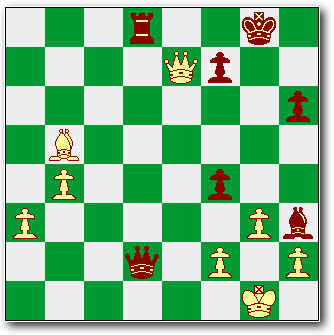
29. Qe7?
Al: I opt for the stupid. Since I had no other real choice, I thought I'd go for a bluff. I could have mate in 3 if Black makes any other move except Bh3.
Ty: The refusal to trade Queens here is a mistake. True, the trade leaves White with a lousy end game, but now Black mates in 3.
29. ... Bh3

Al: Like I didn't see it coming.
0-1 White resigns.
Ty: Another good game in our on-going series. White's development through move 10 is excellent, and the English Opening really left me groping initially. I think the crucial turn-around element for Black was the ability to establish a Knight outpost so deeply in White's territory.
Al: Once again, I was done in by a single pawn, which kept my position cramped and gave Black the chance to control most of the board. The Knight on the second rank was just what else was needed to cramp my position enough for Black to completely dominate the game. I really need to remember the saying, "Pawn play is to chess what putting is to golf."
|

