February 11, 1999
Game Two
White: Ty Davison
Black: Allen Starfy
Opening: B19 Caro-Kann, Classical, Spassky Variation
E-mail, Game 2, 1997
Al: Well, Ty, it looks like I let you win another game. ;-) But, unlike our first game, in which I felt I played in a very slip-shod manner and with no real plan, I was pretty pleased, as it were, with the playing in this game. My choice of the Caro-Kann was a little risky in my mind, because, while I've been studying it for some time, this was my first attempt to use it in an actual game. In hind-sight, maybe I should have gone with a defense I know better since our playing strengths seem pretty evenly matched. But I must say, I really enjoyed the position that results from the C-K and the slow, somewhat "uncomplicated" manner in which the pieces are developed. I'm sure I'll use it again in the future.
Ty: Interestingly, this was also my first time playing the Caro-Kann, and I can see why players appreciate it. It's a tough defense to crack.
1. e4 c6
2. d4 d5
3. Nc3 dxe4
4. Nxe4 Bf5
5. Ng3 Bg6
6. Nf3 Nd7
7. h4 h6
8. h5 Bh7
9. Bd3 Bxd3
10. Qxd3 Qc7
Ty: The conclusion (I think) of the mainline of popular Caro-Kann opening, a solid Black defense. The critical thing to know is that the Caro-Kann openings develop very slowly for Black, so White has a good opportunity to force Black into awkward development. Early on it's not uncommon to see White controlling most of the board, but this is misleading. The Caro-Kann's power lies in counterattack, and White needs to be very careful not to overexpose himself, like I proceeded to do on my next move.
Al: Yes, moves 1-10 are the basic 'main-line' of the C-K so there really isn't much to say about it.
11. Qf5!?
Ty: Determined to get off the Caro-Kann's mainline, I thought a nice Queen thrust might jar proceedings sufficiently. It's not a terribly sound move--the Queen is too easily forced back at this stage of the game--but it worked to throw us off the main line, apply a lot of pressure and enliven the proceedings.
Al: I was pleased to see this because, at the time, I thought it had a "desperate" feel to it.
Ty: Someone was continuing to goad me with "Still on the mainline, ho-hum, just looking moves up in a book, ho-hum, no thought required..." I was happy, nay, thrilled to get off the mainline.
11. ... N(g)f6
12. Bf4
Ty: The Bishop is now forcing the Queen either back (blocking a castle) or into a really lame position. Either alternative is okay by me!
12. ... Qb6
13. 0-0-0
Ty: Instead of 0-0-0, I strongly considered going b3 here and castling Kingside next move (what protection it would have offered!), but I figured Al would soon force my Queen back, and this way at least I could double up on the d-file.
Al: This, I felt was a good choice, Ty, but was hoping to see you castle K-side as it would have made things very easy for me.
13. ... e6
Ty: See? Back goes my Queen.
14. Qd3 Be7
Ty: I think 14. ... Nd5 would have been better here since it forces either 15. Be5 (countered by 15. ... f6) or 15. Bd2 (which messes up the doubling on the d-file). Be7, though it clears rank 8 for castling, also gives the initiative to White. 14. ... Qa5 is also an option.
Al: Yes, ...Nd5 may have been a better choice but at that time I was thinking about castling as well as making a rush up the K-side.
15. Ne5 Nxe5
16. Bxe5 Ng4
Al: I really wanted to be here because my next move, 17. ...Nxf2! would fork the Queen as well as both Rooks, from there I would take the R on h1, the N on g3 and, my plan at the time, the pawn on h5.
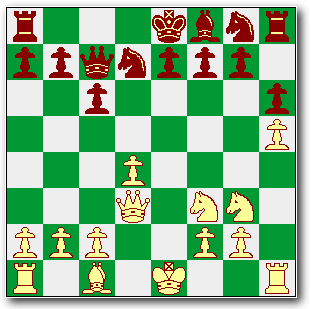
17. Bxg7!
Ty: A very nerve-wracking move. I analyzed everything as deeply as I could here, but it's just one of those situations where there are so many variables that it's difficult to be certain that the move is sound. (Oh, to have a few more brain cells!) It's a sacrifice, of course, because if Al plays it right (and he did) I'm going to be giving up a Knight for a pawn. At the same time, it's important to realize that positional advantages can count for a lot more than material. From this point forward, my main objective will not be capturing Black's King but rather to Queen my pawn on h5. Obviously chess is a fluid game and all moves link to one another, but from White's perspective if there's a "move of the game," this is it.
17. ... Nxf2!
18. Qd2 Nxh1
19. Bxh8 Nxg3
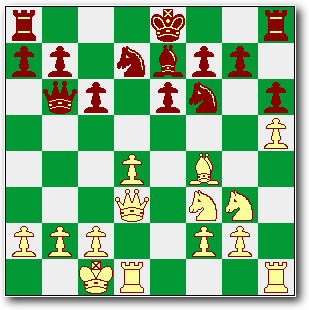
20. Qxh6
Al: This stopped me from taking the pawn on h5 which, again in hindsight, I should have done anyway. I would have lost the N but at least I would have gotten rid of that advanced pawn. I think saving my N at this time basically lost the game for Black.
Ty: That's essentially true--taking h5 probably would've guaranteed at least a draw--but it would've taken a better chess player than me to make that trade; keeping the material advantage is just too powerful a temptation. As it stands after 20. Qxh6, Al's up a Knight, but I now control the entire upper right corner of the board. Fair trade? I think so, but only time will tell. An extra Knight is not a huge advantage, particularly in the end game. It simply moves too slowly and strangely to be a very effective piece.
20. ... Nf5
21. Qf4 Bd6
22. Be5 0-0-0
23. g4 Bxe5
24. dxe5
Ty: Was this a mistake? Should I have taken with the Queen? Maybe. I played it out both ways and found advantages going both directions. I decided to go with the pawn since I thought it would let me more easily trade off the rooks, and that was crucial to Queening my h-pawn.
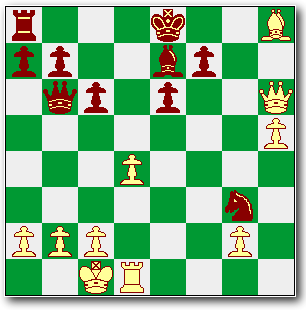
24. ... Nd4
Al: I was very happy with this move and had planned it sometime earlier. I felt it would put a "crimp" in White's plan for a bit as well as buy me a little time.
Ty: This is a very nice move, and a lot more dangerous than I originally thought. If White doesn't move either the King or Queen (or if White moves poorly) Black's got a split with Ne2.
25. Qe4 c5
26. c3 Nc6
27. Rxd8+
Ty: Getting rid of the Rook on the 8th-rank is crucial if I'm going to successfully Queen my h-pawn.
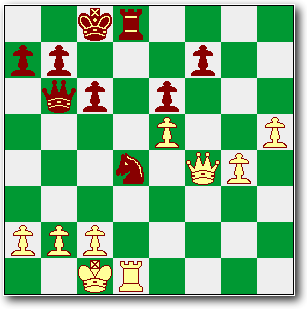
27. ... Nxd8??
Al: I see this as a mistake now; it would have made much more sense to capture with the Queen.
Ty: I agree. Qxd8 would've offered more opportunities in terms of going after White's King and protecting the 8th rank. With the Rook gone, there's now virtually no protection for the 8th rank and the pawn on h5 is now in a race to Queen.
28. h6 f6
29. h7 Nf7
30. Qg6 Qc7
31. Qg8+ Nd8
32. h8=Q
Al: It was here I realized my game had bitten the proverbial "big one."
32. ... fxe5
33. Qh2
Ty: This creates a pin of the Black's Queen. I've either blocked Black's lead pawn or we're going to trade Queens. Since I've got an extra, a trade of Queens suits me just fine.
Al: Qh2, Here's where I learned a great lesson, that is, never play chess without your glasses. For this move I wrote Qh7 and moved the piece on my board. Not that it makes much difference, I played it out both ways and it came out the same, but at the time I wouldn't have 33....e4, and given a straight shot at the Queen.
33. ... e4
34. Qxc7+ Kxc7
35. Qh7+
Ty: A split between the King and the lead pawn. The King is forced to move off, and White picks off the lead pawn. There is now no hope of Black Queening a pawn unless I blunder horrifically.
1-0 Black resigns.
Ty: A good, tense game, and one that really points up the importance of positional play. Had Black been able to stop White's h-pawn, the material advantage probably would have been enough for Black to win.
Al: This was a nice game in which I felt we both made some really decent (and a few not so decent) moves.
|