February 11, 1999
Game Two
White: Ty Davison
Black: David Hemstreet
Opening: Ruy Lopez, Exchange Variation, 5. 0-0
E-mail, Game 2, 1998
1. e4 e5
2. Nf3 Nc6
3. Bb5 a6
4. Bxc6
Dave: This was surprise No. 1. I had not yet played the exchange variation and was a bit perplexed on how to proceed. Of course I took the Bishop with the d pawn, in order to open up the Bishop.
4. ... dxc6
5. 0-0 Nf6
Ty: Through 5. 0-0, we were on the mainline of the Ruy Lopez Exchange Variation. Black's 5. ... Nf6, however, is out of book, and not a great move. Black's pawn on e5 is toast, and a similar attack on White's e4 pawn holds unsavory complications.
Dave: I admit that 5. ...Nf6 was a move that was not quite thought out. I assumed that bringing out a Knight early on would not have many negative consequences, and besides, it attacks White's pawn in return. It looks like it might be time for me to buy a book of openings.
6. Nxe5
Dave: After I had moved my Knight, I realized that attacking the pawn was a mistake. White's Re1 pins my Knight against my King. Instead, I go for a move that develops a piece and makes White move his Knight for a third time.
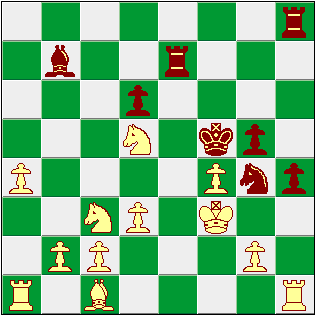
6. ... Bd6
Ty: What to do here? It's important not to yield to the very temping sacrifice 7. Nxf7 which forces a break in the pawn wall and wipes out Black's ability to castle. A better possibility is d4 which protects the Knight, noting that White's e4 pawn is still poisoned for Black because of 8. Qe1. Yet another potential move is a retreat to 7. Nf3, though it seems better to play 7. Nc4 which can maintain the pressure on Black.
7. Nc4?
Dave: White is now putting pressure on my Bishop. My gut reaction to this move was to move the Bishop out of danger, but in hindsight, what are the consequences of this trade? I end up getting rid of my doubled pawns. Castling now may have been the safest and most sound move at this point, but instead, I go for something a bit more dramatic.
7. ... Bxh2+!?
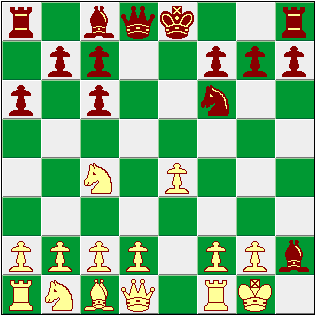
Dave: I have to say that this move was most probably influenced by all the chess puzzles I had recently been working on, which always seemed to involve a sacrifice for a win.
Ty: Wow. This was unexpected. I'm not certain it's sound, but it definitely throws a monkey wrench into the works. (Indeed, in an over-the-board match, I'd be inclined to make it 7. ... Bxh2+! of "!?") White's 7. Nc4? is more clearly now dubious piece placement. A simple retreat with 7. Nf3 was the correct option.
8. Kxh2 Ng4+
9. Kg3
Ty: White has five possible moves, yet only Kg3 is safe.
9. ... b5?
Dave: This move was intended to remove the White Knight's protection on d6, so I could move my Queen there on the next move. It turns out that this move for the Queen was not so sound, but there you have it.
Ty: I originally thought that 9. ... Qg5 would've been a killer move for Black, but Dave pointed out that 10. f4 gave White plenty of answers.
Dave: Despite the questionable motivation for this move, it at least makes White move the Knight again instead of developing another piece, while I get to advance a pawn. Looking at the board again, I see a move that could win a Rook (9. ...h5 10. Qe2 h4 11. Kh3 Ne3+ 12. Kh2 Nxc2 and the White Rook is toast). This also plants a pawn deep in enemy territory.
Ty: I thought that your advanced h-pawn was, in fact, your most dangerous threat on the board for most of the game.
10. Na5
Ty: There's a temptation here for 10. f3, but that would result in doubled pawns. Another line, like 10. Ne3 Nxe3 11. fxe3 which also opens the file for the Rook, still leaves the King far more exposed than I would care for.
10. ... Qd6+?
Ty: Not the best of moves since it allows White to continue natural development, though it's all right if Black is looking to castle long and it helps his own development. All the kingside attacking moves from Move 9 still apply.
Dave: Well, sometimes things like this happen. In my excitement, I forgot that pawns can move two squares on their first advancement. If 11. f4 were not legal, then this would have forced the King onto f3 and forked the Rook! This also brings the Queen into the game, and c6 is now guarded. This would have been a good move if not for those pesky rules!
11. f4 g5!?
Ty: With this 11. ... g5!? Black gambles hard that he can make something happen early on; if the match heads to an end game, the gummed up pawn structure and minor piece disadvantage should be telling. Note that White has no need of 12. fxg5 thanks to the forthcoming Bishop protection.
Dave: Yes! A gamble. I could feel that a checkmate was there, only to be found, and I figured I would somehow be able to find it, or that White would blunder and allow me to win. Unfortunately, I forgot a good rule, which is to assume that your opponent will find the correct response to your attack. I think a castle at this point would have been the better option.
Ty: That's a tough call for me because castling and the kingside pawn storm are so diametrically opposed in nature. Given the aggressive game play you've had going up to this point, I probably would've opted to continue it like you did.
12. d3
Ty: Continued pawn development which protects e4 and frees the Bishop to guard f4.
12. ... h5
Dave: I think Rg8 would have been an interesting move to play.
Ty: Agreed. 12. ... Rg8 looks like a winner. Nonetheless, Black's idea of a kingside pawn storm is a pretty interesting one as well. Although the attacking thread is pretty easy to follow, the Knight outpost and pawn storm combination create some complications for White. Still, Black's backed into a corner to a certain degree: He must be aggressive now, since an end game is likely fatal. White needs to watch for forks from Black's Knight, but careful play should allow him to escape with a decisive advantage.
13. Rh1
Ty: This prevents a wide variety of forks from Black's Knight. (For example, it eliminates 13. ... Ne3 and the line of 13. Kf3 Nh2!) White's King protects against 13. ... Nf2 forking the Queen and Rook.
13. ... h4+
Ty: A logical progression. White has three options: Kh3, Kf3, and Rxh4. Since 14. Kh3 Ne3+ and 14. Rxh4 gxh4, only 14. Kf3 is viable.
14. Kf3 f5
Ty: I liked 14. ... Nf6! with the idea of 15. ... Bg4+ better.
Dave: Wow, that is nice!
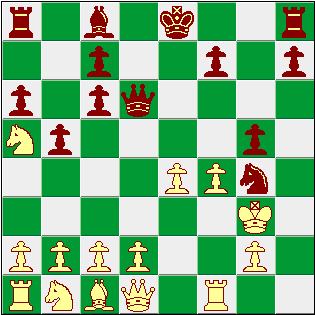
15. Qe1
Ty: On d1, White's Queen is effectively out of the action, so move 15 needs to be an attempt to get her into play. Of the options, a move to the e-file gives White the best chance to launch a counter attack because an attack through the middle activates the Queen.
15. ... fxe4+?
Dave: Again, a check, but what does this do for Black? Desperation was setting in, and I was not yet ready to give up the attack. I think that castling here would have been the best option.
Ty: Black's attack has begun on run out of steam. Although 15. exf5+ checks the King, it also allows White to activate his Queen, perhaps turning the game decisively.
16. Qxe4+ Be6
17. Qxc6+!
Dave: I like this move, because it not only takes a pawn, it makes sure that Black does not control the e file after the Queen trade.
17. ...Kf7?
Ty: White virtually assures a trade of Queens which, since he has a material edge, bodes well for him. Black's 17. ... Kf7? is the move of someone who does not want to trade Queens and hopes that White won't either. Unfortunately, it ends up just harming pawn structure and costing a tempo.
Dave: Well, this is actually the move of someone who knows that a queen exchange is in the works, and despite not wanting to part with the Queen, tries to do something to better the outcome. However, instead of enhancing my position, I ended up shooting myself in the foot. I was thinking that having a pawn in the center would be a good idea ("control the center!"). Well, having a lone pawn in the center is not quite controlling it. By isolating my pawn, I ended up weakening it. Also, moving the King to f7 was in the plan so as to move towards the action and to serve some purpose.
18. Qxd6 cxd6
Ty: Strategically, the game has turned. Black's early attempt to force a mate has failed, and he'll enter the end game down a pawn and a minor piece and with worse pawn structure.
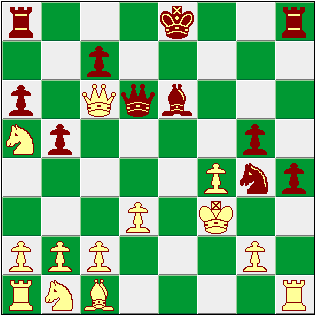
19. Nc3!
Ty: This is an excellent square for the White Knight. He protects against 19. ... Bd5+ and can block the e-file by 20. Ne4.
19. ... Kg6
20. Nc6 Rae8
Dave: I think I should have used the Rook on the h file for this task. It would have prevented some of the unpleasantries with losing the pawns in the next few moves.
21. a4!
Ty: By advancing the a-pawn, White forces Black to either advance the pawn into the path of his c6 Knight or to play 21. ... bxa4 22. Rxa4 activating White's Rook along the fourth rank.
21. ... b4
22. Nxb4 Kf5
23. Nxa6 Bc8
Ty: Black's King advance is clearly designed to free the Bishop from protection duty of the Knight. Unfortunately for Black, this has cost two pawns.
24. Nc7 Re7
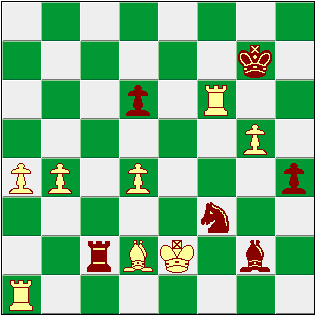
25. N7d5 Bb7!
Ty: Black pins the Knight to the King in a move that, while obvious to me, I underestimated. The key here is that White's King is trapped and any check will equal a mate. That means that if the c3 Knight is taken (since it provide the protection to the d5 Knight), Bxd5++.
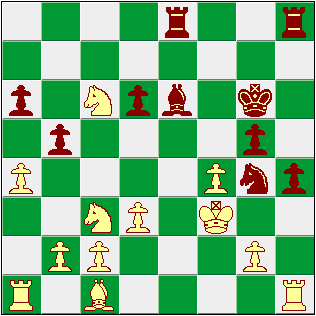
26. Bd2
Ty: This move effectively shuts down 26. ... Rhe8 because 27. Rhe1 Rxe1 28. Rxe1 Rxe1 29. Bxe1 simplifies into an overwhelmingly winning endgame for White. At the same time, Black can cause some serious problems with 26. ... Rc8! which threatens 27. ... Rxc3! The only antidote that I see is 27. Rhe1! Rxc3 28. Rxe7 Bxd5 29. Ke2. It's a mess, but it's a mess that should favor White thanks to his material advantage.
26. ... Rc8!
27. Rhe1!
Ty: As predicted, Black sacs the Rook. 27. Rhe1! not only foils the checkmate attempt, it also allows White to maintain his Rook pair.
27. ... Rxc3
28. Rxe7 Bxd5+
29. Ke2 Rxc2
30. fxg5
Ty: This gives White another passed pawn, and a protected one at that. Further along in the end game, the distance between passed pawns may become crucial since the Black's King won't be able to stop every pawn from Queening.
30. ... Bxg2
31. b4!
Ty: A much more important move than it looks. Because Black's Bishop controls the a8-h1 diagonal, it will take two pawns to queen on either a8 or b8.
31. ... Ne5!?
Dave: This was merely a stepping stone. The final destination for the Knight is f3, where hopefully it will be of use to a queening pawn.
Ty: This is an excellent square for the Knight, but the Knight has the unfortunate handicap of being forced off by 32. d4. There is case to be made for 31. ... h3 which leaves the pawn two steps from the Holy Grail and protects the Bishop. The Black Knight's current location on g4 should protect the pawn's advance to h2, and I would suspect that White will be eventually forced to trade his a-Rook for the Black's h-pawn when it queens.
32. d4 Nf3
33. Rf7+ Kg6
34. Rf6+ Kg7
Ty: 34. Rf6+ was important so that Black's King couldn't immediately nab my pawn once the Rook moved off. Note also that if Black had chosen 34. ... Kh5, White's g-pawn could have Queened in 3 moves.
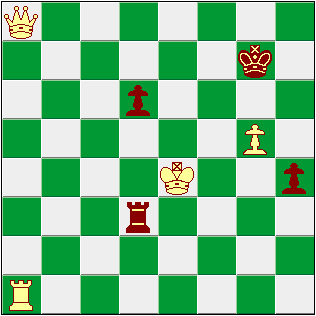
35. Rxf3!!
Dave: Excellent move! I would say that this was the best move of the game. In no way did I anticipate or see this coming. After this move, I knew I was in deep trouble, and only continued play out of hoping that Ty would blunder and I could somehow get a draw out of it.
Ty: Moves 35 and 36 probably represent the best end game combination I've ever put together.
35. ...Bxf3+
36. Kxf3 Rxd2
Ty: This is called losing the battle to win the war. White trades a Rook and a Bishop for a Knight and a Bishop, and loses the exchange. However, the Bishop is actually poisoned. Once Black plays 36. ... Rxd2, the game is effectively over since there's no way to stop White from queening his a-pawn.
37. a5 Rb2
38. a6 Rxb4
39. a7 Rxd4
40. a8=Q
Ty: Black gobbles a couple of now-meaningless pawns. If he doesn't resign, Black will be checkmated shortly.
40. ... Rd3+
Dave: Enter the Starfy "spite" check!
41. Ke4 1-0
Ty: This was a game with some very exciting chess. Dave is clearly a very aggressive player, and his strategy of minor piece sacrifice followed by a kingside pawn storm could well have been fatal for me in an over-the-board match where calculation is much more difficult. The flipside of course, was that once the early attack was blunted, the lack of material and imperfect piece placement almost insured a loss in the end game. It wasn't easy to get there, however! There was some excellent and interesting chess played here.
Dave: A good game indeed. Despite a few confused moves, and my initial impulse to resign after my initial pawn storm had failed, there was still plenty of interesting chess to play. Lessons learned? Pawns are better when together, pawns can move two squares on their first move, always assume your opponent will figure the way out, and always have a good book of openings handy.
|